- Published on
JWT Authentication and Authorization with TypeScript, Express, and MongoDB
- Authors

- Name
- Frank Atukunda
- @fatukunda
Table of Contents
- Introduction
- Setting Up a MongoDB Database on Atlas
- File Structure
- Install Dependencies
- Define Environment Variables
- Setting up an Express Server
- Connecting to MongoDB Database with Mongoose
- Defining User Model with Mongoose Schema
- Defining User Controllers
- Creating authentication middleware
- Defining User Routes
- Testing Routes with Postman
- Project Git repository
- Conclusion
Introduction
Welcome to our comprehensive tutorial on building a REST API with Node.js/Express and MongoDB! Throughout this guide, we'll walk you through the process of creating a robust API that empowers users to perform essential actions such as user creation, login, profile retrieval, single-device logout, and multi-device logout.
Harnessing the power of Node.js/Express alongside MongoDB, we'll craft a seamless experience for handling user interactions efficiently. To ensure scalability and accessibility, we'll leverage MongoDB Atlas, a versatile cloud database service designed specifically for hosting MongoDB databases.
While MongoDB Atlas offers unparalleled convenience, it's worth noting that you can opt for a local MongoDB setup if preferred. However, for the sake of clarity and focus, we'll omit the installation and configuration of a local MongoDB database in this tutorial.
Prepare to embark on a journey towards mastering RESTful API development with Node.js, Express, and MongoDB. Let's dive in!
Setting Up a MongoDB Database on Atlas
To begin with, let's establish a MongoDB database on Atlas. If you haven't created an account on MongoDB Atlas yet, fear not! You can easily sign up for free here.
Once you've successfully logged in to your account, navigate to the dashboard sidebar and select Database. From there, follow these simple steps:
1. Creating a Database:
- Click on
Build a Database. - Opt for the
M0free version, maintainAWSas the provider, allowing MongoDB to automatically select the closest region to you. - Name your cluster without any spaces. For instance, I've named mine
mainCluster. - Hit the green
Createbutton to initiate the process.
2. Configuring Access:
- As your cluster is being created, establish a database
usernameandpassword. Keep these credentials handy as they'll be necessary for the connection string. - Select My
Local EnvironmentunderWhere would you like to connect from?. - In the
IP Access Listsection, add0.0.0.0/0to grant access from anywhere. Provide a brief description and clickFinish and Close.
3. Connecting to your Database:
- Locate the cluster you created and click on the
Connectbutton situated at the top left corner. - A modal will appear; navigate to
Driversunder theConnect to Your Application section. - You'll be directed to the
Select your driver and versionscreen. Stick with the defaultNode.jsdriver and version. - Copy the connection string provided and securely store it. This string will be crucial for connecting to our MongoDB database.
- The connection string should resemble this:
mongodb+srv://<username>:<password>@maincluster.fg2lmpc.mongodb.net/?retryWrites=true&w=majority&appName=MainCluster. - When utilizing it, remember to replace
<username>and<password>with the credentials you established earlier.
Congratulations! You've successfully set up a MongoDB database on Atlas.
With the MongoDB setup complete, let's now dive into the fun parts.
File Structure
Now that our database is well set up, we can go ahead and create our project. Create a folder anywhere on your computer and name it. I’ve chosen user-registration-api for mine but feel free to pick a name that suits your project.
└── src/
    ├── app.ts
    ├── controllers/
    │   └── userController.ts
    ├── db/
    │   └── index.ts
    ├── middleware/
    │   └── auth.ts
    ├── models/
    │   └── User.ts
    └── routers/
        └── userRoutes.ts
src/: This is our root folder where our project resides.
- app.ts: This file will serve as the entry point for our Express server.
- controllers/: Contains the logic for handling different user-related operations.
- db/: Houses the database connection logic.
- middleware/: Stores middleware functions, including the
authmiddleware for securing endpoints. - models/: Holds the data models for our application. In this case, we'll have a
Usermodel. - routers/: Handles routing logic for our API endpoints. Specifically,
userRoutes.tswill define routes related to user interactions.
I personally use VS Code, but feel free to use any IDE you're comfortable with. Assuming you already have Node.js and npm installed, we're all set to proceed. If not, you can easily install them from here.
Once that’s done, still, on your terminal, navigate to your project root folder and type yarn init to initialize our node project. This will provide you with a series of questions that you can navigate through by just hitting enter to accept the default options. This process will create a package.json file which will list all the packages our project depends on.
Install Dependencies
Our project will need a number of npm packages and below is the list of those packages and a brief explanation of what each of those packages will help us achieve.
- Express: A node.js framework that makes it easy to build web applications.
- mongodb: Official MongoDB driver for Node.js.
- Mongoose: A MongoDB object modeling tool designed to work in an asynchronous environment. We shall use mongoose to define database schemas and interact with the database.
- bcrypt: This will help us hash user passwords before storing them into the database.
- jsonwebtoken: This will help us generate JSON web tokens for authentication. This package will help to set up protected routes that only logged in users can access.
- validator: We shall use this package to validate and sanitize user input, for example, we need to ensure that a user gives us an email in the right format.
- env-cmd: This will help us load environment variables from a
.envfile. - nodemon: This will help us run our server in development mode.Nodemon will re-run the express server every time we make changes to our code.
- Typescript: This will help us write our code in a more structured and readable way.
Now that we've identified the essential packages for our project, let's proceed with their installation. Open your terminal and ensure that you're still positioned in the root directory of your project. Run the following command:
yarn add express mongodb mongoose bcryptjs validator jsonwebtoken
This command installs the necessary packages and adds them to our project's dependencies in the package.json file. Additionally, we'll include nodemon and env-cmd as development dependencies by executing:
yarn add env-cmd nodemon typescript ts-node-dev @types/express --dev
Generate a tsconfig.json file by running the following command:
npx tsc --init
This command will generate a tsconfig.json file in the root directory of our project and will create some compiler options. Let's leave the defaults as is and proceed to the next step.
Before advancing to the next step, let's set up an environment file where we'll define our environment variables. In the root directory, create a .env file.
Next, open the package.json file and add the following script just after the main:index.js line:
"scripts": {
  "start": "env-cmd -f ./.env nodemon src/app.ts"
}
This script configuration ensures that whenever we execute yarn start, nodemon serves our server defined in src/app.ts, utilizing the environment variables specified in the .env file.
Define Environment Variables
Open the .env file and add the following environment variables.
MONGODB_URL=mongodb+srv://<username>:<password>@clustermain.mcy5faw.mongodb.net/?retryWrites=true&w=majority&appName=ClusterMain
JWT_KEY=WinterIsComingGOT2019
PORT=3000
Remember to replace <username> and <password> with the credentials you established earlier.
Setting up an Express Server
In your project directory, navigate to the src/app.ts file. This file serves as the entry point for your Express server. Below is the code snippet that configures and starts your server:
import express from 'express'
import userRouter from './routes/userRouter'
const port = process.env.PORT || 3000
import './db/db'

const app = express()

app.use(express.json())
app.use('/api/users', userRouter)

app.listen(port, () => {
  console.log('Server is running on port 3000')
})
Let's break down what this code accomplishes:
Express Setup: The code imports the Express framework to create a web server. It also imports the
userRoutermodule, which defines routes related to user operations.Port Configuration: The
portvariable is assigned the value of thePORTenvironment variable, if available. If not, it defaults to port3000. This allows flexibility in deploying our application by allowing the port to be configured via environment variables.Database Connection: It imports the database configuration from
./db/db. This ensures that our Express server connects to the mongoDB database specified in our configuration.Middleware Setup: The server uses
express.json()middleware to parse incoming JSON request bodies. This middleware is essential for handling JSON data in request bodies.Routing: The
userRouteris mounted under the/api/usersprefix. This means that any routes defined in theuserRoutermodule will be accessible under the/api/userspath.Server Startup: The server is started by calling the
listenmethod on the Express application object. It listens for incoming HTTP requests on the specified port. When the server starts successfully, it logs a message to the console indicating the port number.
To run your server, navigate to your terminal and execute the command yarn start or npm start, depending on your package manager. If everything is set up correctly, you should see the message Server is running on port 3000 in your terminal. This indicates that your Express server is up and running, ready to handle incoming requests.
Connecting to MongoDB Database with Mongoose
Go to db/db.ts file and type the code below.
import mongoose from 'mongoose'

if (!process.env.MONGODB_URL) {
  throw new Error('MONGODB_URL is not defined in the environment variables.')
}
console.log('Connecting to MongoDB...')

mongoose.connect(process.env.MONGODB_URL)
This code is responsible for establishing a connection to your MongoDB database using Mongoose, a popular MongoDB object modeling tool for Node.js applications.
Environment Variable Check: The code checks if the
MONGODB_URLenvironment variable is defined. If not, it throws an error indicating that the variable is missing from the environment variables.Connection Logging: It logs a message to the console indicating that the application is attempting to connect to the MongoDB database.
Database Connection: The
mongoose.connect()function is used to establish a connection to the MongoDB database using the URL specified in theMONGODB_URLenvironment variable.
Defining User Model with Mongoose Schema
Now it’s time to define our user model. Head over to /models/User.ts file and type the following code.
import { Schema, model, Document, Model, HydratedDocument } from 'mongoose'
import bcrypt from 'bcryptjs'
import jwt from 'jsonwebtoken'

export interface IUser extends Document {
  name: string
  email: string
  password: string
  tokens: { token: string }[]
}

export interface IUserMethods {
  generateAuthToken(): Promise<string>
  toJSON(): IUser
}

interface UserModel extends Model<IUser, {}, IUserMethods> {
  findByCredentials(email: string, password: string): Promise<HydratedDocument<IUser, IUserMethods>>
}

const userSchema = new Schema<IUser, UserModel, IUserMethods>({
  name: { type: String, required: true },
  email: { type: String, required: true },
  password: { type: String, required: true },
  tokens: [{ token: { type: String, required: true } }],
})

userSchema.pre('save', async function (next) {
  if (this.isModified('password')) {
    this.password = await bcrypt.hash(this.password, 8)
  }
  next()
})

userSchema.methods.generateAuthToken = async function () {
  const user = this
  const token = jwt.sign({ _id: user._id.toString() }, process.env.JWT_KEY as string)
  user.tokens = user.tokens.concat({ token })
  await user.save()
  return token
}

userSchema.methods.toJSON = function () {
  const user = this as IUser
  const userObject = user.toObject()
  delete userObject.password
  delete userObject.tokens
  return userObject
}

userSchema.statics.findByCredentials = async (email, password) => {
  const user = await User.findOne({ email })
  if (!user) {
    return null
  }
  const isMatch = await bcrypt.compare(password, user.password)
  if (!isMatch) {
    return null
  }
  return user
}

const User = model<IUser, UserModel>('User', userSchema)

export default User
This code defines a Mongoose model for managing user data in a MongoDB database. Here's a breakdown of what it does:
User Interface: The
IUserinterface defines the structure of a user document in the database. It includes properties like name, email, password, and tokens.User Methods Interface: The
IUserMethodsinterface defines methods that can be applied to user documents, such as generating authentication tokens and converting user objects to JSON format.User Model Interface: The
UserModelinterface extends the Mongoose Model interface and specifies additional methods available on the User model, like finding users by their credentials.Schema Definition: The
userSchemavariable defines the schema for the User model. It specifies the structure of user documents, including required fields like name, email, password, and tokens.Pre-Save Hook: The
premiddleware function is used to hash the user's password before saving it to the database. This ensures that passwords are securely stored.Instance Methods: Instance methods like
generateAuthTokenandtoJSONare added to the userSchema. These methods handle token generation for authentication and customize the user object returned by toJSON() to exclude sensitive information like passwords and tokens.Static Method: The
findByCredentialsstatic method is added to the User model. It allows finding a user by their email and password combination, facilitating user authentication.Model Creation: Finally, the User model is created using the
model()function, which binds the schema definition to the User model and exports it for use in other parts of the application.
This code provides a robust foundation for managing user data and authentication in a Node.js application using Mongoose and MongoDB.
Defining User Controllers
The next step would be to create controllers to handle user registration and login. Copy the code below to /controllers/userController.ts:
import User from '../models/user'
import { IUser } from '../models/user'

export const registerUser = async (user: Partial<IUser>) => {
  const { name, email, password } = user
  if (!name || !email || !password) {
    return {
      error: 'Please provide all the required fields',
    }
  }
  const existingUser = await User.findOne({ email })
  if (existingUser) {
    return {
      error: 'User with that email already exists.',
    }
  }
  const newUser = new User({ name, email, password })
  await newUser.save()
  const token = await newUser.generateAuthToken()
  return {
    user: newUser,
    token,
  }
}

export const loginUser = async (user: Partial<IUser>) => {
  const { email, password } = user
  if (!email || !password) {
    return {
      error: 'Please provide all the required fields',
    }
  }
  const existingUser = await User.findByCredentials(email, password)
  if (!existingUser) {
    return null
  }
  const token = await existingUser.generateAuthToken()
  return {
    user: existingUser,
    token,
  }
}
The provided code defines controller functions responsible for handling user registration and login operations in the application. Let's break down each controller function:
registerUser
- Functionality: This function handles the registration process for new users.
- Parameters: It takes a partial user object containing the user's name, email, and password as input.
- Input Validation: It checks if all the required fields (name, email, password) are provided. If any of the fields are missing, it returns an error message.
- Existing User Check: It queries the database to check if a user with the provided email already exists. If a user with the email exists, it returns an error message indicating that the user already exists.
- User Creation: If the email is unique, it creates a new user instance with the provided name, email, and password, and saves it to the database.
- Token Generation: After saving the new user, it generates an authentication token for the user using the
generateAuthTokenmethod defined in the User model. - Return Value: It returns an object containing the newly created user and the authentication token.
loginUser
- Functionality: This function handles user login operations.
- Parameters: It also takes a partial user object containing the user's email and password as input.
- Input Validation: Similar to the registration function, it checks if both the email and password are provided. If any of the fields are missing, it returns an error message.
- User Authentication: It attempts to find a user with the provided email and password combination using the
findByCredentialsstatic method defined in the User model. - Token Generation: If the user is found and the password matches, it generates an authentication token for the user.
- Return Value: It returns an object containing the authenticated user and the authentication token.
These controller functions serve as the intermediary between the HTTP routes and the database operations, encapsulating the logic for user registration and login within separate functions for clarity and maintainability.
Creating authentication middleware
Middleware serves as a crucial component in software architecture, acting as a bridge between the database and the application, particularly within a network environment. In the context of this project, our objective is to intercept incoming requests before they reach the server and produce a response. The middleware plays a pivotal role in enforcing authorization checks, ensuring that only authorized individuals can access specific resources within the application.
Head over to /middleware/auth.ts and write the following code.
import { Request, Response, NextFunction } from 'express'
import jwt from 'jsonwebtoken'
import User, { IUser } from '../models/user'

export interface CustomRequest extends Request {
  user?: IUser
  token?: string
}

interface DecodedToken {
  _id: string
}

const auth = async (req: CustomRequest, res: Response, next: NextFunction) => {
  try {
    const token = req.header('Authorization')?.replace('Bearer ', '')
    if (!token) {
      throw new Error('Authentication failed. Token missing.')
    }

    const decoded = jwt.verify(token, process.env.JWT_KEY as string) as DecodedToken
    const user = await User.findOne({
      _id: decoded._id,
      'tokens.token': token,
    })

    if (!user) {
      throw new Error('Authentication failed. User not found.')
    }

    req.user = user
    req.token = token
    next()
  } catch (error) {
    res.status(401).send({ error: 'Authentication failed.' })
  }
}

export default auth
The provided middleware code is responsible for authenticating incoming requests by verifying the presence and validity of JSON Web Tokens (JWTs). Let's break down the functionality of this middleware:
Custom Request Interface: The
CustomRequestinterface extends the default ExpressRequestinterface to include additional propertiesuserandtoken, which represent the authenticated user and the JWT token, respectively.DecodedToken Interface: The
DecodedTokeninterface specifies the structure of the decoded JWT token, containing the_idfield representing the user's unique identifier.Middleware Function: The
authfunction is an asynchronous middleware function that takes three parameters:req(request),res(response), andnext(next middleware function).Token Extraction: It extracts the JWT token from the request header using the
"Authorization"header. If the token is missing, it throws an error indicating authentication failure due to a missing token.Token Verification: It verifies the authenticity and validity of the JWT token using the
jwt.verify()method. If the token is invalid or expired, it throws an error.User Retrieval: It queries the database to find the user associated with the decoded token's
_id. If no user is found or if the token is not associated with the user, it throws an authentication error.Request Modification: If the authentication is successful, it attaches the authenticated user and token to the request object (
req.userandreq.token), making them available to subsequent middleware functions.Error Handling: It catches any errors that occur during the authentication process and sends a 401 (Unauthorized) status response along with an error message indicating authentication failure.
Export: The middleware function is exported as the default export, making it accessible to other parts of the application.
This middleware ensures that only authenticated users with valid JWT tokens can access protected routes, enhancing the security of the application.
Defining User Routes
Now most of the pieces are in place. All that's left is to define the routes for this application. Head over to /routes/userRouter.ts and define the following routes:
import express from 'express'
import { IUser } from '../models/user'
import { loginUser, registerUser } from '../controllers/userController'
import auth, { CustomRequest } from '../middleware/auth'

const router = express.Router()

router.post('/register', async (req, res) => {
  const userData: Partial<IUser> = {
    name: req.body.name,
    email: req.body.email,
    password: req.body.password,
  }
  const registeredUser = await registerUser(userData)
  if (registeredUser.error) {
    return res.status(400).json({
      error: registeredUser.error,
    })
  }
  return res.status(201).json(registeredUser)
})

router.post('/login', async (req, res) => {
  const userData: Partial<IUser> = {
    email: req.body.email,
    password: req.body.password,
  }
  const loggedInUser = await loginUser(userData)
  if (loggedInUser?.error) {
    return res.status(400).json({
      error: loggedInUser.error,
    })
  }
  return res.status(200).json(loggedInUser)
})

// Fetch logged in user
router.get('/me', auth, async (req: CustomRequest, res) => {
  return res.status(200).json({
    user: req.user,
  })
})

// Logout user
router.post('/logout', auth, async (req: CustomRequest, res) => {
  if (req.user) {
    req.user.tokens = req.user.tokens.filter((token) => {
      return token.token !== req.token
    })
    await req.user.save()
  }

  return res.status(200).json({
    message: 'User logged out successfully.',
  })
})

// Logout user from all devices
router.post('/logoutall', auth, async (req: CustomRequest, res) => {
  if (req.user) {
    req.user.tokens = []
    await req.user.save()
  }
  return res.status(200).json({
    message: 'User logged out from all devices successfully.',
  })
})

export default router
The provided code defines routes for user registration, login, fetching user details, and user logout operations. Let's explore each route in detail:
/register (POST)
- Functionality: This route handles user registration by accepting POST requests with user data (name, email, password) in the request body.
- Controller Function: It calls the
registerUsercontroller function, passing the user data extracted from the request body. - Response Handling: If the registration is successful, it returns a 201 (Created) status along with the registered user data. If registration fails due to missing fields or duplicate email, it returns a 400 (Bad Request) status with an error message.
/login (POST)
- Functionality: This route handles user login by accepting POST requests with user credentials (email, password) in the request body.
- Controller Function: It calls the
loginUsercontroller function, passing the user credentials extracted from the request body. - Response Handling: If login is successful, it returns a 200 (OK) status along with the logged-in user data and authentication token. If login fails due to invalid credentials, it returns a 400 (Bad Request) status with an error message.
/me (GET)
- Functionality: This route fetches details of the logged-in user.
- Middleware: It utilizes the
authmiddleware to ensure that only authenticated users can access this route. - Response Handling: If the user is authenticated, it returns a 200 (OK) status along with the user details. If authentication fails, it returns a 401 (Unauthorized) status.
/logout (POST)
- Functionality: This route logs out the user from the current device.
- Middleware: It utilizes the
authmiddleware to ensure that only authenticated users can access this route. - Response Handling: If the user is logged out successfully, it returns a 200 (OK) status with a success message.
/logoutall (POST)
- Functionality: This route logs out the user from all devices.
- Middleware: It utilizes the
authmiddleware to ensure that only authenticated users can access this route. - Response Handling: If the user is logged out from all devices successfully, it returns a 200 (OK) status with a success message.
These routes handle various user operations, ensuring proper authentication and authorization throughout the application.
Testing Routes with Postman
Now that all the pieces have been put together, we can test our API using Postman. Postman is a powerful tool for testing APIs and verifying their functionality.
Follow these steps to test your API:
Download Postman: If you haven't already, download and install Postman from postman.com.
Launch Postman: Open Postman and create a new request by clicking on the
+icon in the top left corner.Send Requests: Choose the appropriate HTTP method (e.g., POST, GET, PUT, DELETE) and enter the URL of the endpoint you want to test. Here are some examples from our application:
- To register a new user:
POST http://localhost:3000/api/users/register- Request Body (JSON):
{ "name": "John Doe", "email": "john@example.com", "password": "password123" }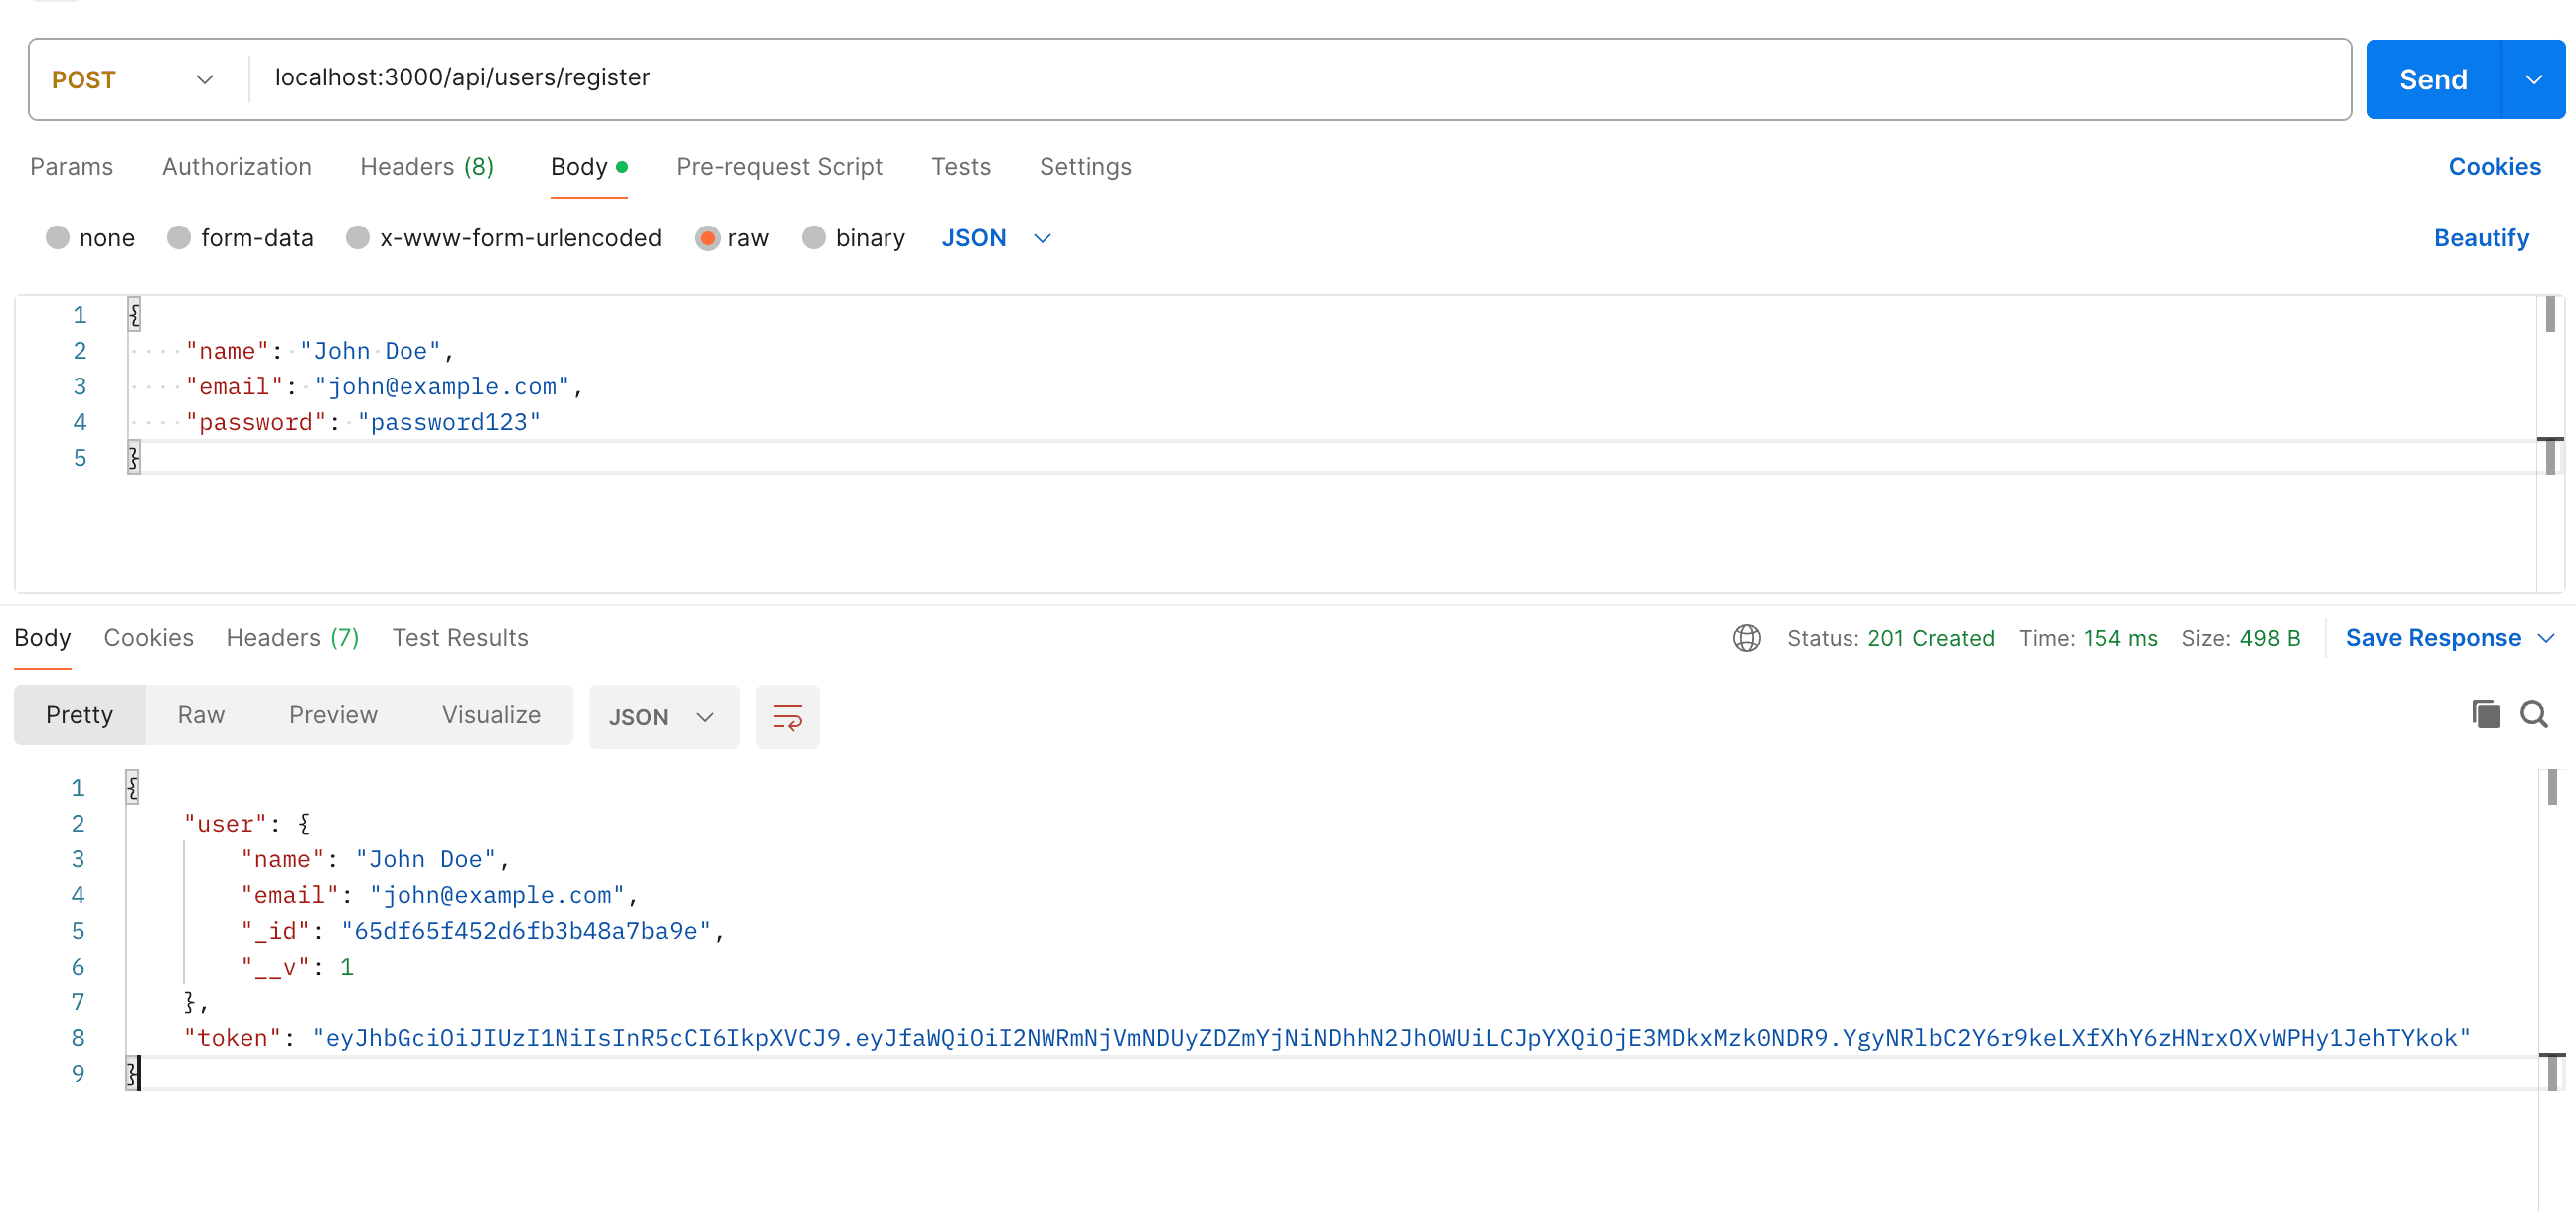
- To log in:
POST http://localhost:3000/api/users/login- Request Body (JSON):
{ "email": "john@example.com", "password": "password123" }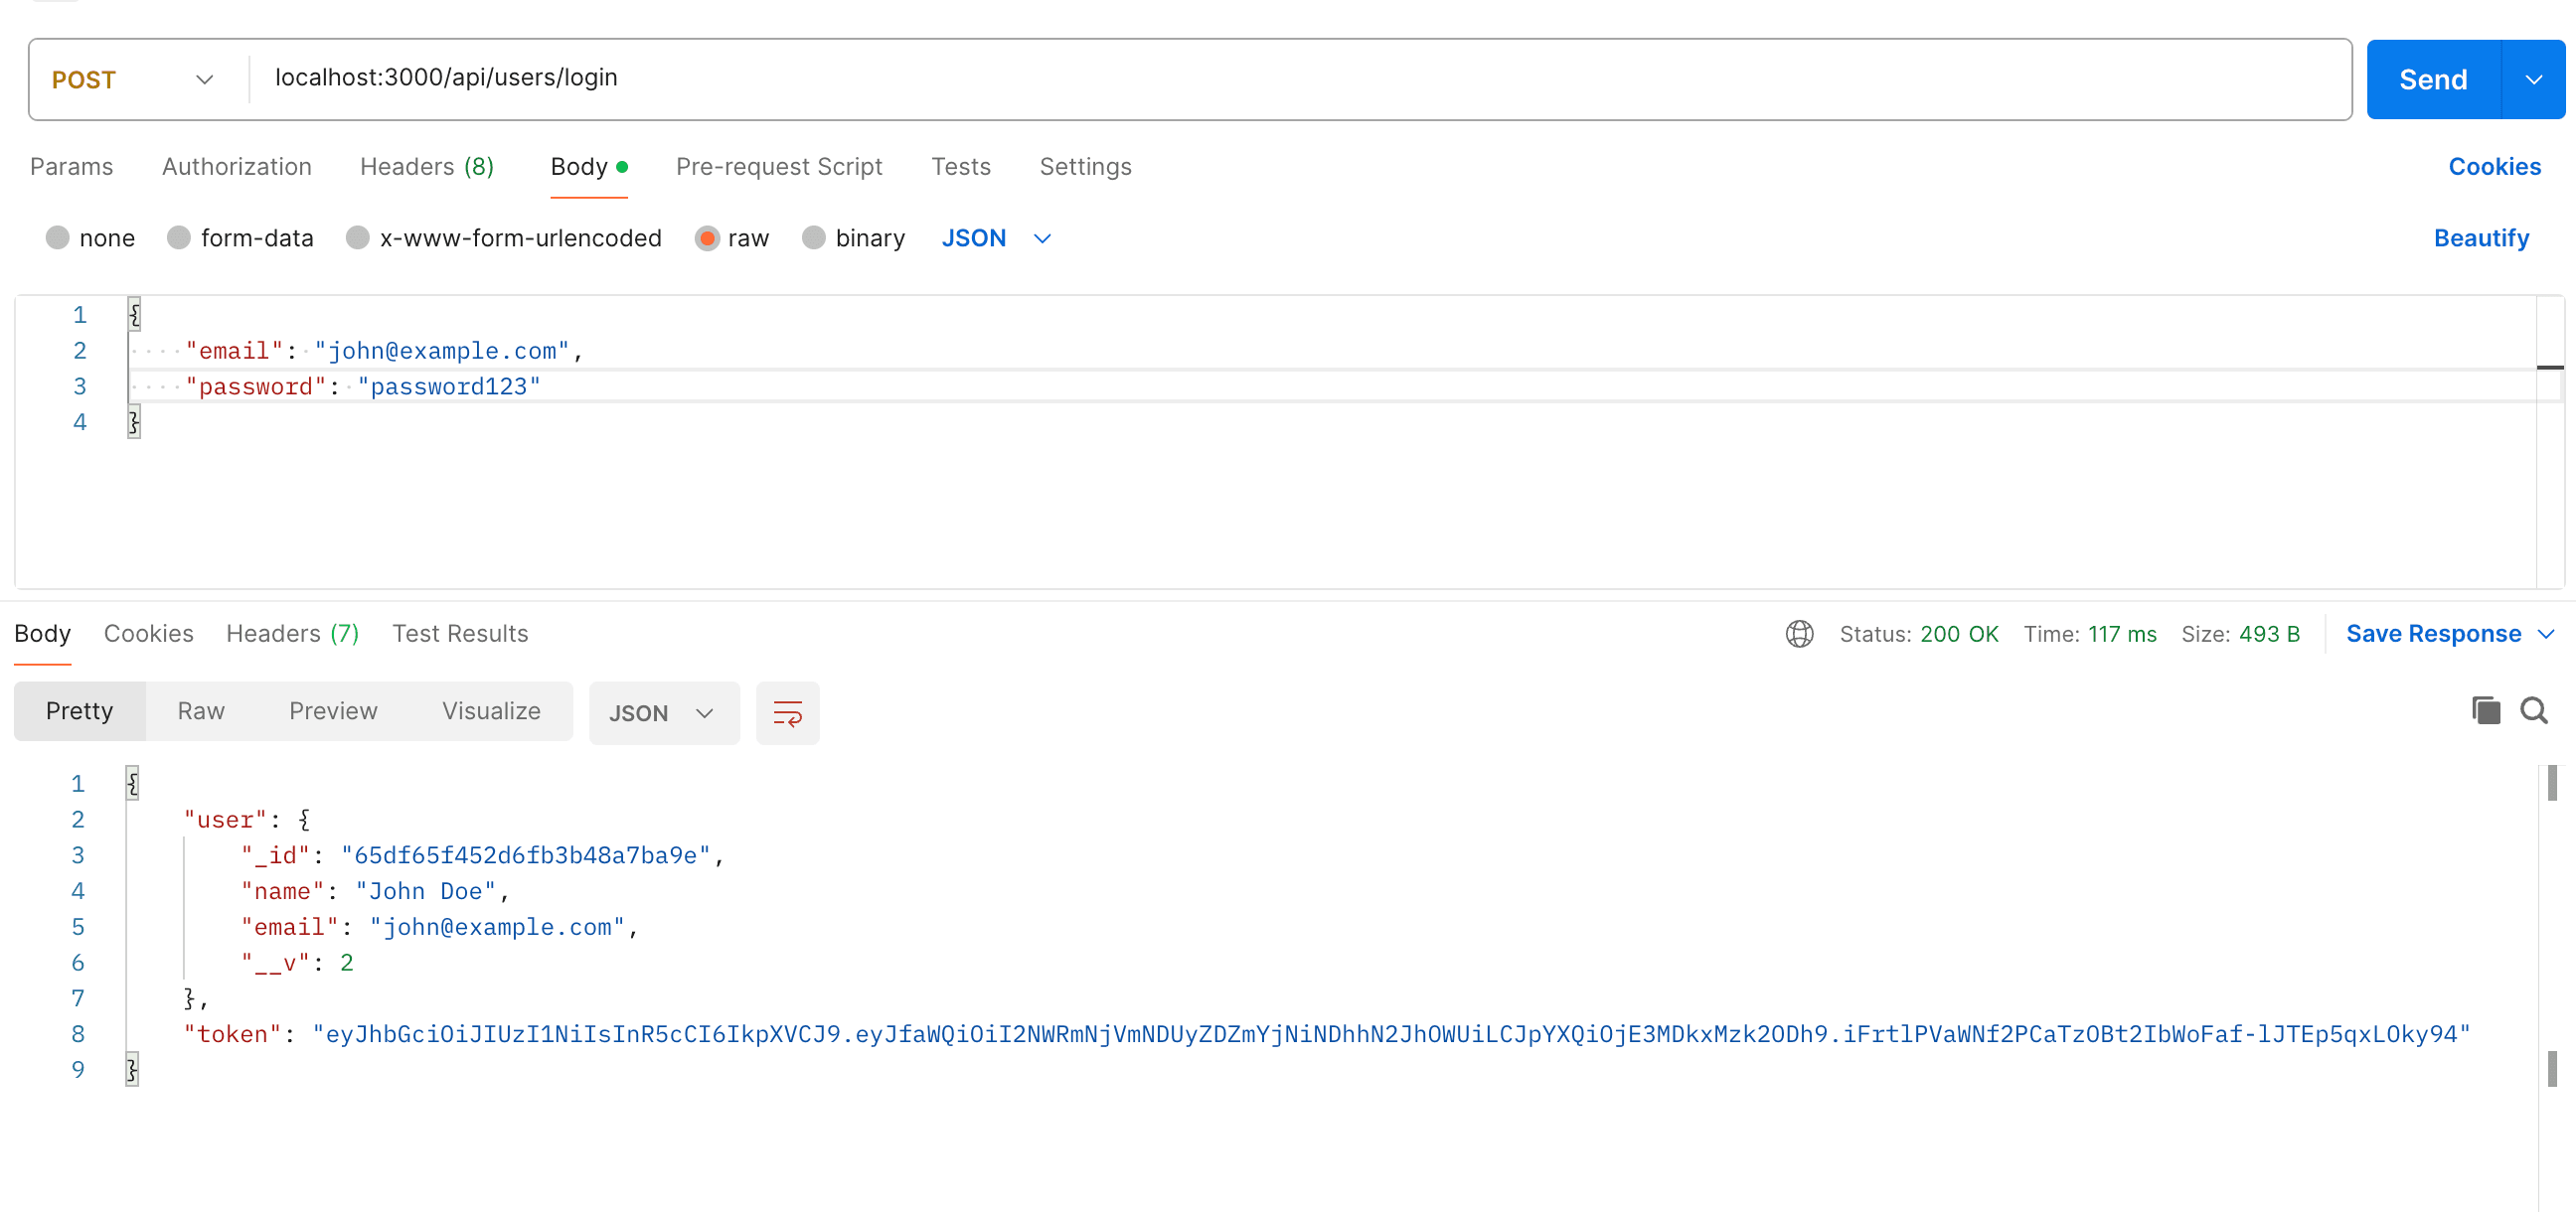
- To fetch user details:
GET http://localhost:3000/api/users/me(Requires authentication)- To authenticate, include the JWT token in the Authorization header of the request. Set the header as follows:
- Key:
Authorization - Value:
Bearer YOUR_JWT_TOKEN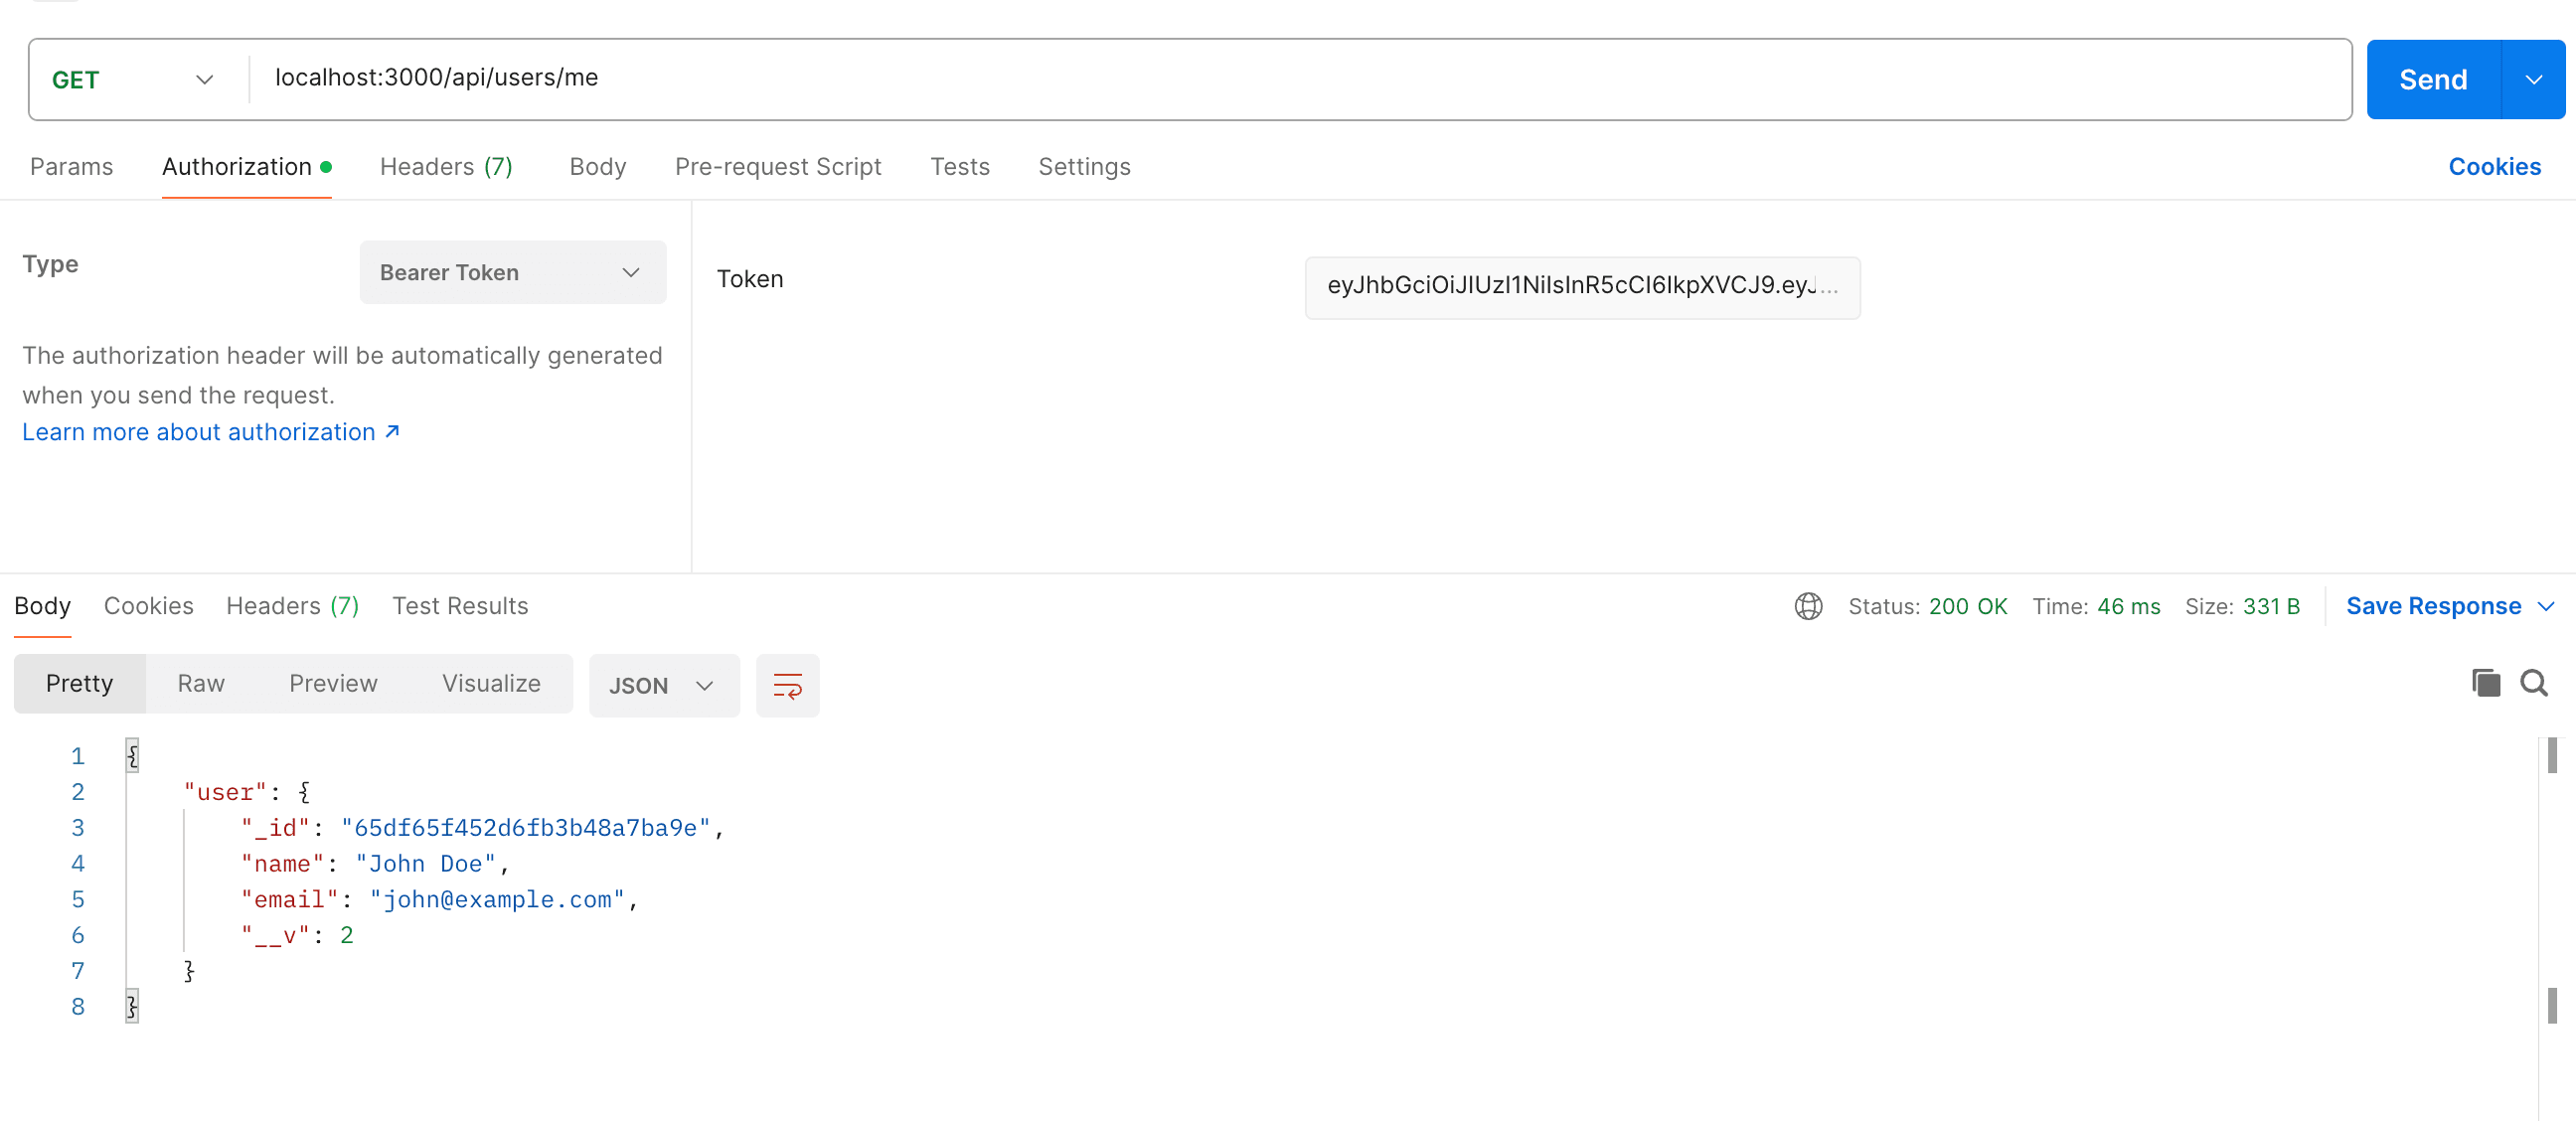
- Key:
- To authenticate, include the JWT token in the Authorization header of the request. Set the header as follows:
- To log out:
POST http://localhost:3000/api/users/logout(Requires authentication)- Include the JWT token in the Authorization header as described above. Test it out yourself. Try to use the same token after logout and see what happens.
- To log out from all devices:
POST http://localhost:3000/api/users/logoutall(Requires authentication)- Include the JWT token in the Authorization header as described above.
- To register a new user:
Send Request: Click the "Send" button to send the request to your API.
Inspect Response: Once you've sent the request, inspect the response returned by your API. Check the status code, response body, and any headers to ensure that the API is functioning as expected.
Test Different Endpoints: Repeat the process for each endpoint you want to test, including registration, login, fetching user details, and logout operations.
Handle Errors: If you encounter any errors or unexpected behavior during testing, review your code, middleware, and database configurations to identify and resolve issues.
Iterate and Improve: Use Postman to iteratively test and refine your API. Experiment with different input data, edge cases, and scenarios to ensure robustness and reliability.
By thoroughly testing your API with Postman, you can identify and address any issues or bugs before deploying it to production, ensuring a seamless experience.
Project Git repository
You can explore the entire project repository on GitHub for reference and deeper understanding. Here's the link to the repository: GitHub Repository.
Conclusion
Congratulations on completing this tutorial! We've covered a lot of ground, and I hope you've gained valuable insights into building a user registration and authentication API with Node.js, Express.js, and MongoDB.
If you have any questions or need further clarification on any part of the tutorial, don't hesitate to reach out. I'm here to help!
Keep exploring, learning, and building amazing projects!
Till next time, happy coding!